
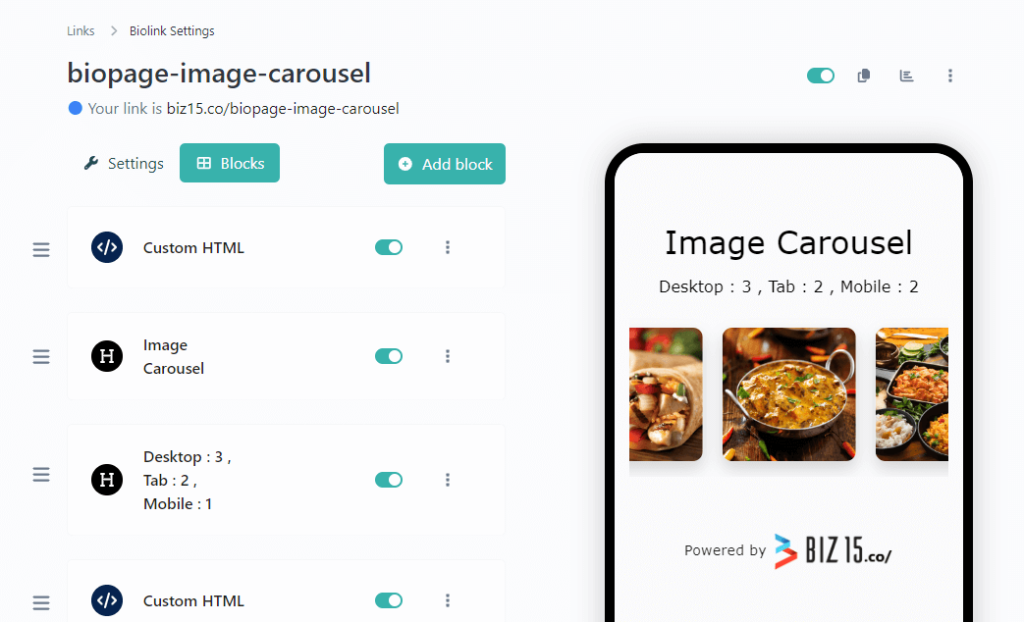
To integrate this Image slider or carousel into your biography page, please follow these installation instructions.
Step One: Insert a Custom HTML Block.
Step two: Paste the following code into your HTML block.
  <script>
  // Create a new instance of the SwiperSlides class
  new SwiperSlides('your-unique-slier-id', {
      // Slider configuration options
      name: 'your-unique-slider-name',
      type: 'circle',
      hoverEffect: 'zoom-out',
      title: {
          // Title appearance and styling options
          titleAppearance: false, // Disable title appearance
          titleLocation: 'bottom', // Set title location to the bottom
          titleColor: 'black', // Set title color to black
          titleSize: '16px', // Set title font size to 16px
          titleBgColor: 'rgba(0, 0, 0, 0.4)' // Set title background color with opacity
      },
      pagination: {
          // Pagination options
          active: false, // Disable pagination
          type: 'line', // Set pagination type to line
          color: '[your-color]' // Set pagination color
      },
      imgs: [
          // Image data for the slider
          {
              title: 'Image Title', // Set image title
              img: '[your-image-url]' // Set image URL
          },
          {
              title: 'Image Title',
              img: '[your-image-url]'
          },
          // Add more image data objects as needed
      ],
      slidesPerView: {
          // Slides per view configuration for different screen sizes
          mobile: {
              slides: 2, // Set the number of slides on mobile
              spaceBetween: 20 // Set space between slides
          },
          tab: {
              slides: 2, // Set the number of slides on tablet
              spaceBetween: 20 // Set space between slides
          },
          desktop: {
              slides: 3, // Set the number of slides on desktop
              spaceBetween: 20 // Set space between slides
          }
      },
      loop: true, // Enable loop to create a circular effect
      autoplayBetweenTime: 2500, // Autoplay interval in milliseconds
      centeredSlides: true, // Center slides
      reverseDirection: false // Do not reverse slide direction
  });
</script>
The result following the completion of the steps.
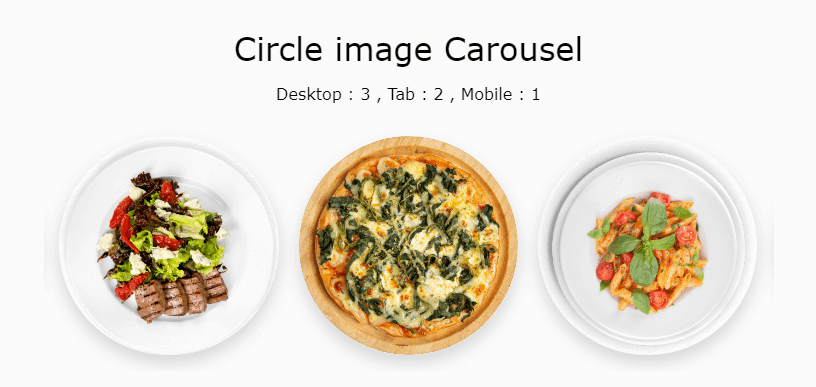
Creating Circular Slide Images :
Create A Stunning Web Pages
Here’s an example of how to create a circular image using CSS:
    new SwiperSlides('your-unique-slier-id', {
        ......
        type: 'circle',  // options "square" , "circle" , "coverflow" , "cube" and "flip"
        ......
    });
Make Image Carousel move Reverse :
Within the autoplay field, you can adjust the speed to control the reverse motion of the carousel by adding“reverseDirection: true,”
    new SwiperSlides('your-unique-slier-id', {
      ......
      reverseDirection: true // this option controls reverse true or false
    });

Adding Pagination to Your Image Carousel :
You have the option to add pagination of your image carousel.
    new SwiperSlides('your-unique-slier-id', {
      ......
      pagination: {
        // Pagination options
        active: true, // Active pagination
        type: 'dots', // Set pagination type options "dots" , "line" and "number"
        color: '[your-color]' // Set pagination color
      },
      ......
    });
If you need line pagination, you can implement it using the following code:
    new SwiperSlides('your-unique-slier-id', {
      ......
      pagination: {
        // Pagination options
        active: true, // Active pagination
        type: 'line', // Set pagination type options "dots" , "line" and "number"
        color: '[your-color]' // Set pagination color
      },
      ......
  });

If you need number pagination, you can implement it using the following code:
    new SwiperSlides('your-unique-slier-id', {
      ......
      pagination: {
        // Pagination options
        active: true, // Active pagination
        type: 'number', // Set pagination type options "dots" , "line" and "number"
        color: '[your-color]' // Set pagination color
      },
      ......
    });

Creative Image Carousel : Cover Flow Effect
ou have the option to Customize your image carousel Coverflow effect.
  new SwiperSlides('your-unique-slier-id', {
    ......
    type: 'coverflow',  // options "square" , "circle" , "coverflow" , "cube" and "flip"
    ......
});

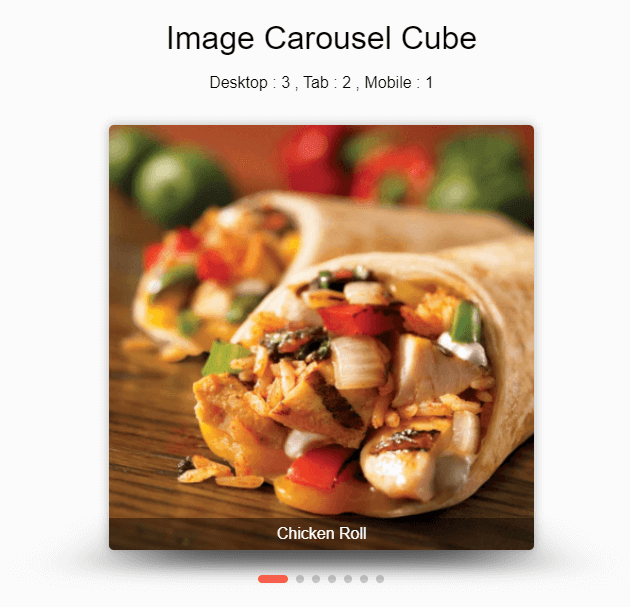
Creative Image Carousel : Cube Effect
You have the option to Customize your image carousel Cube effect
  new SwiperSlides('your-unique-slier-id', {
    ......
    type: 'cube',  // options "square" , "circle" , "coverflow" , "cube" and "flip"
    ......
});
Creative Image Carousel : Flip Effect
You have the option to Customize your image carousel Flip effect.
  new SwiperSlides('your-unique-slier-id', {
    ......
    type: 'flip',  // options "square" , "circle" , "coverflow" , "cube" and "flip"
    ......
});

To upload an image and retrieve its source (URL), please follow these steps :
Select or Prepare Your Image: Begin by choosing the image you wish to upload, ensuring it’s in an appropriate format (e.g., JPG, PNG).
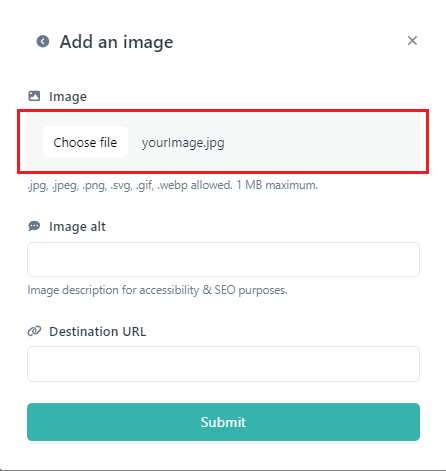
Step One : Insert an image block into your biography page.
Step Two: Select your desired image and proceed by clicking the “Submit” button.
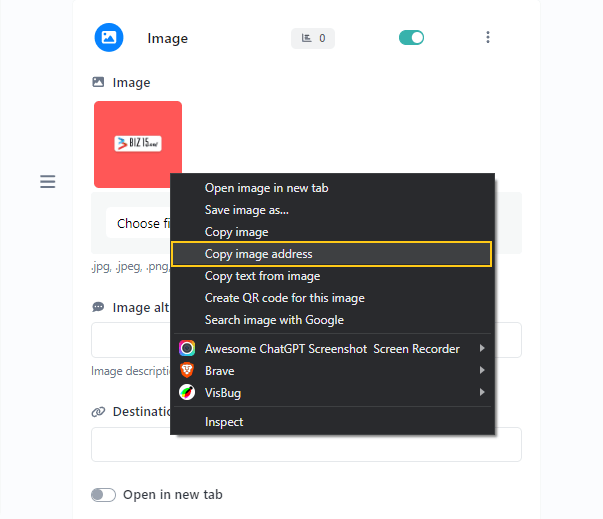
Step Three: Now, open your image block, right-click on the image, and select “Copy Image Address.”
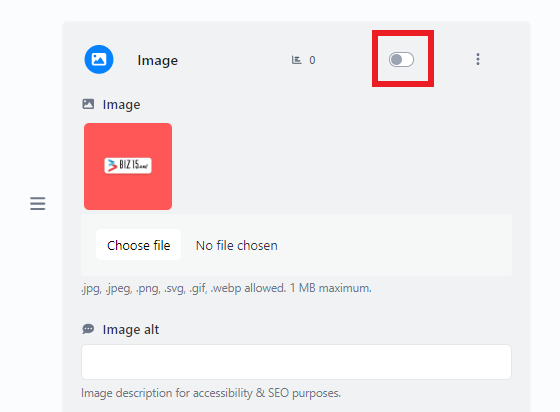
Step Four: Ensure that your image is not visible in the live view by disabling your status.
Here is an example of how you can use the image source (URL) in an HTML “img” tag:
<img src="https://biz15.co/yourImage.jpg" alt="Description of the Image">
Replace ‘https://biz15.co/yourImage.jpg’ with the actual URL you received during the image upload process.
“Follow the previously mentioned steps to upload and obtain the image URL for all of your images.”
0 comments
Write a comment